The genesis
From Arduino to a custom framework
Abstract
This article relates RMESS research team’s embedded framework switch. It was initiated by the upgrade of our DecaWave UWB (Ultra Wide Band) radio modules. Work on our Arduino based software was required. As we progressed with the port, more and more hacks were needed, making the usage of Arduino less and less relevant. Therefore we undertook a complete rework resulting in a clean custom solution with full control of the tools and software.
Context
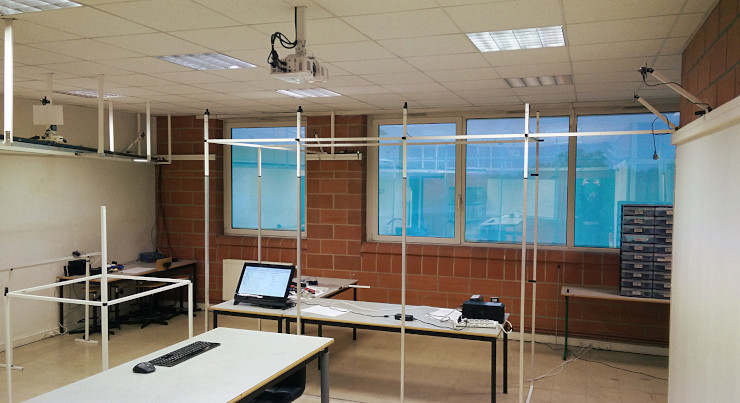
The following work is carried out in the RMESS (Réseaux , Mobiles, Embarqués, Sans fil, Satellites) team of the IRIT (Institut de Recherche en Informatique de Toulouse) research lab. Part of the team is working on wireless networks on embedded systems. Traditionally experiments for networking researches are conducted with software simulations. Instead, the team focuses on real-world conditions testing. In order to achieve this, the team has developed its own hardware called DecaWiNo and infrastructure called LocURa4IoT (Localisation and UWB-Based Ranging Testbed for the Internet of Things).
 DecaWiNo
 Testbed
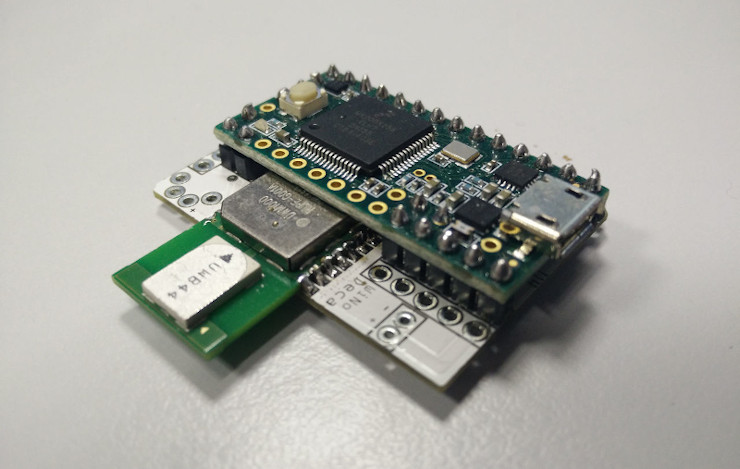
Diving a bit deeper into the hardware, the DecaWiNo is a device including a PJRC Teensy 3.1/3.2 and a DWM1000 UWB (Ultra Wide Band) radio module. Programming this hardware is done through Arduino to simplify the developments. Hence the team has created a library called DecaDuino to handle the communication with the radio module.
Since then, DecaWave has released a new module called DWM1001.
 DWM1001
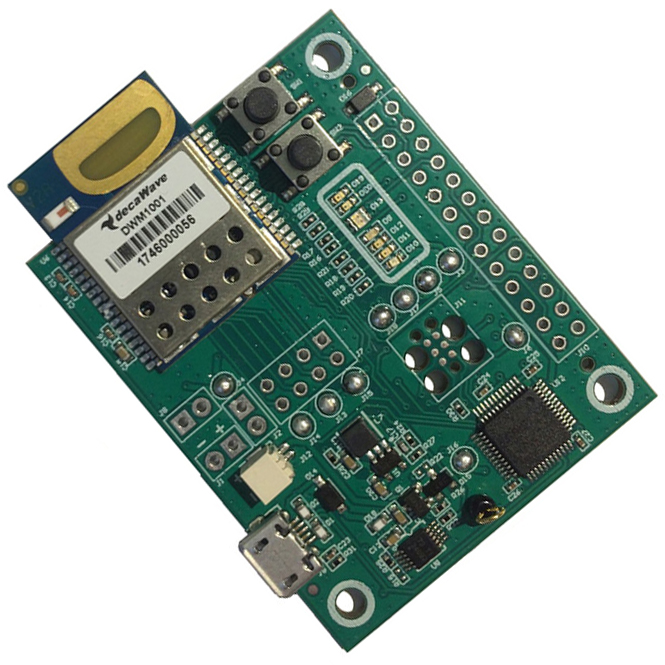
One of the main selling points of this module is its antenna supposed to be better than the one found on the DWM1000. Another important point is that the module now includes a microcontroller, a nRF52. Being reflashable, this means that an extra microcontroller is no longer required. For testing purposes, DWM1001-DEV, development boards with an on-board debugger were purchased by the team. Now that we are convinced with the new module’s advantages we are gradually replacing all DecaWiNos with DWM1001 boards.
 DWM1001-DEV
Programming this new hardware has required some work due to the microcontroller change.
Port for Arduino
Arduino is very rich ecosystem with a wide hardware support, tools and software libraries. The nRF52 microcontroller is already supported in the nRF5 port but the DWM1001-DEV board pinout was not included. With the help of the other boards configuration, adding the new hardware was rather straightforward. Details can be found here.
Concerning DecaDuino, its code was tied to the Teensy due to the pinout and libraries. The quickest (and not the cleanest) way of handling this was to use ifdefs based on the board. For example:
#ifdef ARDUINO_DWM1001_DEV
DecaDuino decaduino(SS1, DW_IRQ);
#else
DecaDuino decaduino;
#endif
or
#ifdef ARDUINO_DWM1001_DEV
#define SPI SPI1
static inline uint32_t begin_atomic()
{
    uint32_t prim = __get_PRIMASK();
    __disable_irq();
    return prim;
}

static inline void end_atomic(uint32_t prim)
{
    if (!prim) {
        __enable_irq();
    }
}

#else
#include <util/atomic.h>
#endif
So far, so good. Arduino and a few hacks have saved the day once again.
End of story? Not really… The thing is that DecaDuino doesn’t cover all the features of the radio modules. For example, it doesn’t support channel and datarate configuration. Meanwhile, DecaWave has released example code for DWM1001. In this example, a driver layer for the radio is provided. Looking closer, this layer covers the missing wanted features. Once again, opting for the quickest solution, we ported the code of interest into our Arduino library.
The problem was: where was our added value? As we piled hacks we were losing the understanding of our system. This is problematic when stepping out of the prototype phase for which fine-grained control becomes important.
Arduino’s genericity has been a great help but now that we are getting serious with the DWM1001 the overhead brought by Arduino has started to become a burden. We needed to start afresh and build the foundations for robust software.
Building the new foundations
The question was: where do we start? Generally it is sensible to use what the manufacturer provides. In our case it is the DWM1001 example from DecaWave. This provides the driver for the radio module and the nRF SDK (from the nRF manufacturer, Nordic) for the microcontroller. Also, the good news is that the examples are based on FreeRTOS, probably the most popular real time operating system in the embedded world.
A minor issue was that the compilation and debug setup are done for Keil MDK which uses a proprietary compiler. Not willing to be reliant on software vendors we needed to find an open-source alternative. The most important point is the toolchain. Fortunately, there is the GCC toolchain for Arm (the nRF52 being based on a Cortex-M4 core). To manage compilation we adopted a common approach and went for the GNU Make tool. The last tool needed was a debugger to flash the generated firmwares onto the microcontroller. For this we used OpenOCD to handle the interaction with the on-board debugger. Comparing with the Arduino nRF port, we are in fact using the same compiler and debugger.
At that point, our new setup started to look good. We noticed that there was a more recent version of nRF SDK so we went ahead and updated it. This got us diving into the depths of the SDK. It packages a lot of software, way too many for our need as a matter of fact. Also, we found out about the nRF legacy driver and the newer driver called nrfx. Nordic built an adaptation layer in order to make legacy code work. Maintaining code compatibility is wise but in our case we barely had any code. We started to feel like we had traded Arduino’s bloat for nRF’s one. We realized that we were actually still far from our initial idea of full control.
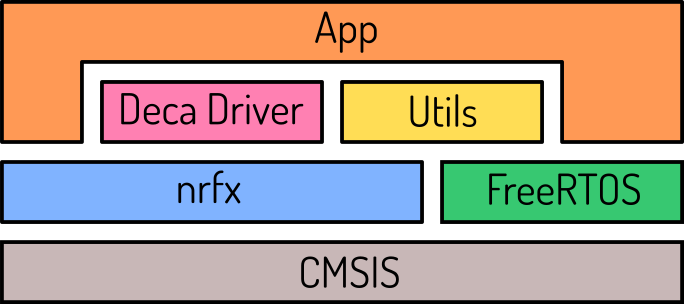
In order to have something clean, we had to identify the required software. It boiled down to:
- The CPU’s driver, CMSIS, from Arm
- The nRF’s peripherals driver, nrfx
- DecaWave’s driver for the radio
- FreeRTOS
This allowed us to manage each library separately. We gained control over the versions used rather than deal with those provided by the package. We could then safely write utilities and applications on top.
Here is an overview of the solution:
 Architecture
Next, we wanted a unified configuration. We started from the bottom, the nrfx configuration. To handle it, Nordic uses a header file with Configuration Wizard Annotations. While the format itself is fine, the tools to handle the configuration are not. The choice given was either using uVision (Keil’s IDE) or CMSIS Configuration Wizard. The latter option has the benefit of being standalone and open-source but works with Java (and Swing for the GUI) and is not very appealing to use.
We decided to convert the configuration to a Kconfig configuration. Kconfig is mostly used in the Linux kernel but also in other projects like Zephyr. The format is exhaustive and various frontends are available. Going back to the actual conversion, a bit of scripting with Python and regexes did the job.
The rest of the configuration was done manually, including writing a Kconfig file for FreeRTOS. The result is quite pleasing, being able to manage dependencies.
 Menuconfig
Writing software on top
Finally we have the foundations and we can write software!
Having a working serial was the first priority. The nRF SDK already provided an implementation of it but it is not taking advantage of RTOS. We decided to have a task for writing and one for reading. Using the “thread safe” structures in FreeRTOS it was relatively simple to achieve. For example, here is how sends are handled:
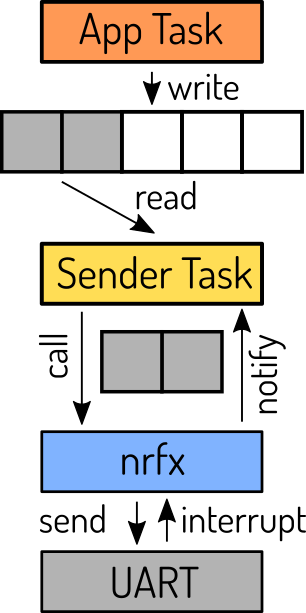 Serial sends overview
Top level send function:
int serial_send(char * data, size_t length)
{
    size_t bytes_sent = 0;
    xSemaphoreTake(writing, portMAX_DELAY);
    bytes_sent = xStreamBufferSend(send_stream_buffer, data, length, portMAX_DELAY);
    xSemaphoreGive(writing);
    return bytes_sent;
}
Task handling sends on the serial:
static void serial_send_task(void * pvParameter)
{
    static uint8_t uart_tx_buffer[UART_TX_BUFFER_SIZE];
    while (true)
    {
        size_t bytes_to_transmit = xStreamBufferReceive(send_stream_buffer,
                uart_tx_buffer, UART_TX_BUFFER_SIZE, portMAX_DELAY);
        nrfx_uart_tx(&serial, uart_tx_buffer, bytes_to_transmit);
        xTaskNotifyWait(0, 0, NULL, portMAX_DELAY);
    }
}
Transmission interruption handling waking up the send task:
static void uart_event_handler(nrfx_uart_event_t const * p_event, void * p_context)
{
    BaseType_t xHigherPriorityTaskWoken = pdFALSE;
    switch(p_event->type)
    {
       ...
       case NRFX_UART_EVT_TX_DONE:
            xTaskNotifyFromISR(serial_send_task_handle, 0, eNoAction,
                    &xHigherPriorityTaskWoken);
            break;
       ...
    }
    portYIELD_FROM_ISR(xHigherPriorityTaskWoken);
}
This is just a start, we have many more features that can be added in the near future.
Conclusion
To wrap up, even though it required some efforts and the loss of hardware backward compatibility, building our own framework was a successful experience. We now have a fully controlled environment, for our new devices, that we can build on top of. Best of all, it is open-source and available on Github. Feel free to download, use and contribute.